So you have your photo studio all set up. The light is pointed at your product and you’re using a diffuser and reflector to avoid harsh shadows. Now, you just point your camera at the product and take a picture, right? Not quite. You might want to compose the photo a little, so it will look more interesting to a potential customer. We have five easy photo composition rules you can use to make your product photo look better.
Now, visual composition is a complicated subject. You can take lots of art classes focused just on that. So how can we say that there are only five rules to follow for photo composition? (Actually, we only have four rules. The fifth is optional.)
Well, we took quite a few art classes many years ago. There, we learned the rules of visual composition. What we found, though, is that you can only keep a few rules in your head when you need to compose quickly. And the rules we present below are the ones we keep in our head and have served us well over the years.
So, here are the rules. We hope they’ll help you too.
Rule 1: Shoot Slightly Off-Center
Usually, placing something dead center makes the composition less interesting. So, even when you have just one thing in your photo, move the center of that thing slightly to the left or right of the frame. Place the object at an angle if you have to, but do not place it dead center in your photo.
Look and evaluate if the placement feels right. Take the shot only if the composition feels pleasant to you.
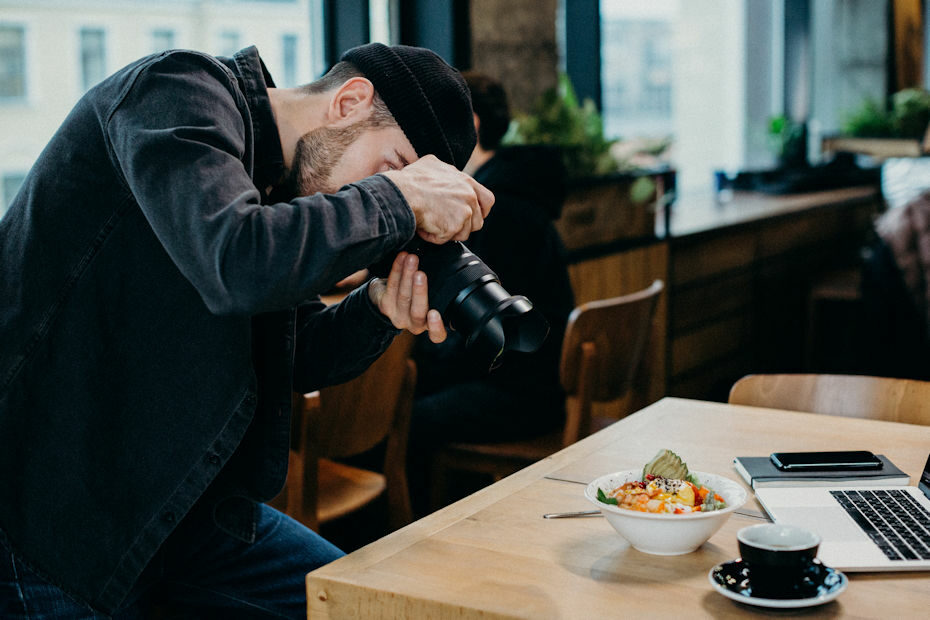
That said, sometimes you shouldn’t follow this photo composition rule. While the photo below is not of a simple product, we shot this dead center. It felt right.

Of course, for product photography, you’ll often want a shot of the product from the front, from the side, from the top, and from the bottom. These are utilitarian shots, so dead center is fine. But for the main photo of the product, try using this rule to attract the attention of the potential customer.
Rule 2: Draw Imaginary Lines for the Eyes to Follow
In the photo above, you can see imaginary lines from the top, middle, and bottom converging to a point in the middle. In the photo below, you can see two lines crossing where the pen’s nib is.
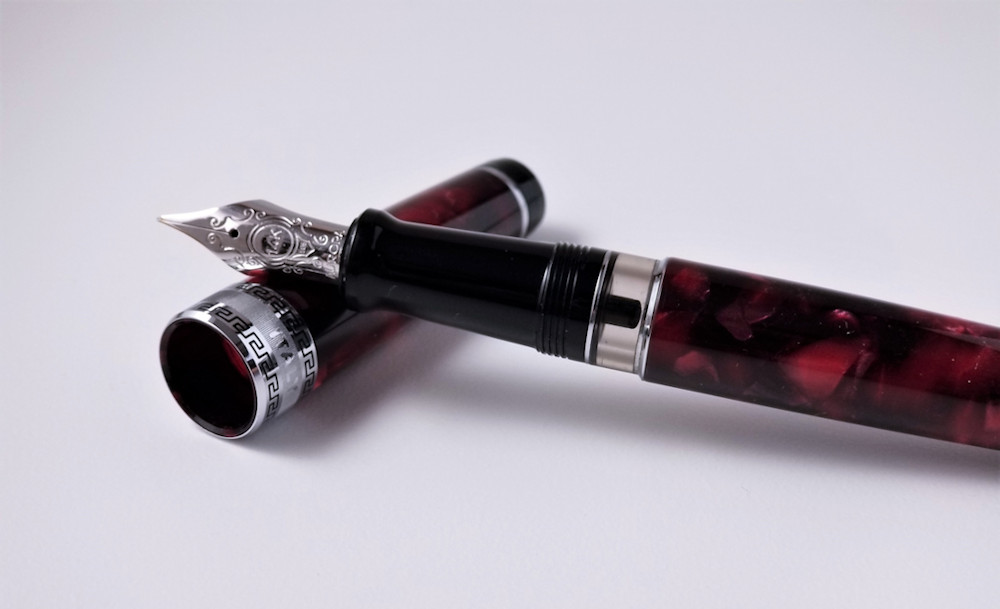
These are the lines you want to find. Your eyes naturally follow these lines to a converging point. That’s where a viewer’s eyes tend to rest.
So, find the feature on your product that you think is most interesting or can attract the most buyers. Then, arrange the product so at least some lines converge at that point.
Rule 3: Use an Odd Number of Items
An odd number of objects is more interesting than an even number. But if you have only one or two items in your shot, try to create an imaginary triangle with the item(s). Each corner of the triangle can be used to make that odd number.
To pose an odd number of items for a shot, first divide the frame into halves horizontally and then vertically. Now, you have four sections in the frame. Think of the sections as a scale that you have to balance.
Next, place your product slightly off center, so it’s not directly in the imaginary crosshairs of your photo. See how that scale feels slightly weighted towards that side? Add objects to the empty parts to “balance” the scale so that nothing feels tilted. Those objects are typically smaller, are in the background, and can be out of focus.
Don’t forget the empty space in your photo. It’s called negative space, and you can use that to balance a photo as well. You’ll just have to use more of it to balance against space with something actually in it.
You want to end up with an odd number of objects in the photo. Sometimes, the easiest way to achieve this is to frame a triangle, so at least you have three corners to satisfy the odd number requirement.
Look at the photo of the pen under Rule 2. There is a triangle in that shot. On one side of the scale, you have the pen’s cap and nib. On the other side of the scale, you have the long pen barrel. The length of the barrel balances the “weight” of the nib and the cap. Had we moved the center of the shot to one side or the other, the photo would feel less balanced.
Rule 4: Shoot High, Shoot Low, and Shoot Close Up
An eye-level shot of any object can be fairly boring. But if you crouch low, climb high, or even get really close, you can make the same object more interesting.
Crouching low can sometimes make an object look more imposing. Climbing high sometimes offers a view not often seen (though this is less true in product photography). Getting really close sometimes points out a detail people miss when looking at the object casually.
Sometimes, the angle of your shot can emphasize or deemphasize particular features of the item you’re photographing. Use the trick to help focus a potential customer’s attention to the selling features of your product.
(Optional) Rule 5: The Rule of Thirds
Our last—and optional—rule is the Rule of Thirds. We think this is an optional rule because we’ve never heard of it until we researched photo composition rules. We do not follow this rule, and we don’t think this has hurt the composition of our photos.
We only present this rule here because everyone else seems to use it. In fact, the rule is so popular that most cameras have a superimposable grid to help a photographer with the Rule of Thirds.
The rule is fairly simple. Divide the frame of your photo into thirds vertically and then horizontally. You’ll get a grid with nine squares.
Line your subject along one of the lines or where two lines intersect. Then line your horizon on or close to one of the two horizontal lines. This helps everything balance, and that is the Rule of Thirds.
If You Keep These Simple Photo Composition Rules in Mind, You Can Shoot Great Product Photos
When we shoot a photo, we usually keep the subject off-center, draw the imaginary lines to focus a viewer’s attention, and keep the items to be photographed in odd numbers. We add more interest by moving the camera up or down or super close up.
We’ve never consciously used the Rule of Thirds. While there are many more rules of visual composition (here’s a great article if you want to learn more), you probably won’t need them for simple product photos taken in a controlled indoor setting.
Finally, always remember that there are no hard rules in art, so there are no hard photo composition rules. A good artist merely has a better sense of which ones to use and which ones to discard for a given situation. The tips in this article usually make a photo look better, but not always. At the end of the day, rely on your sense of aesthetics and make your final decision that way.
Questions? Comments?